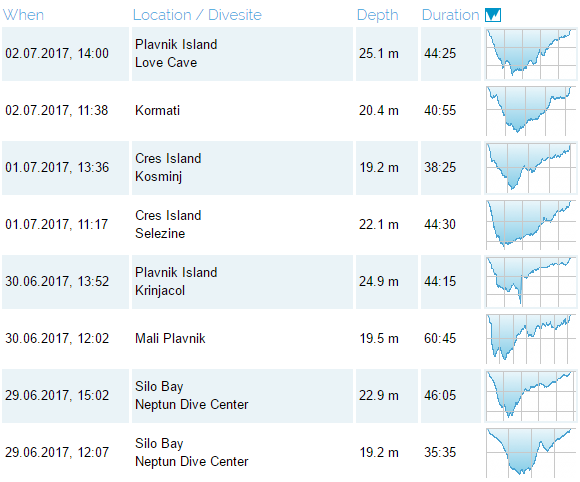
Results of the test week on Krk island
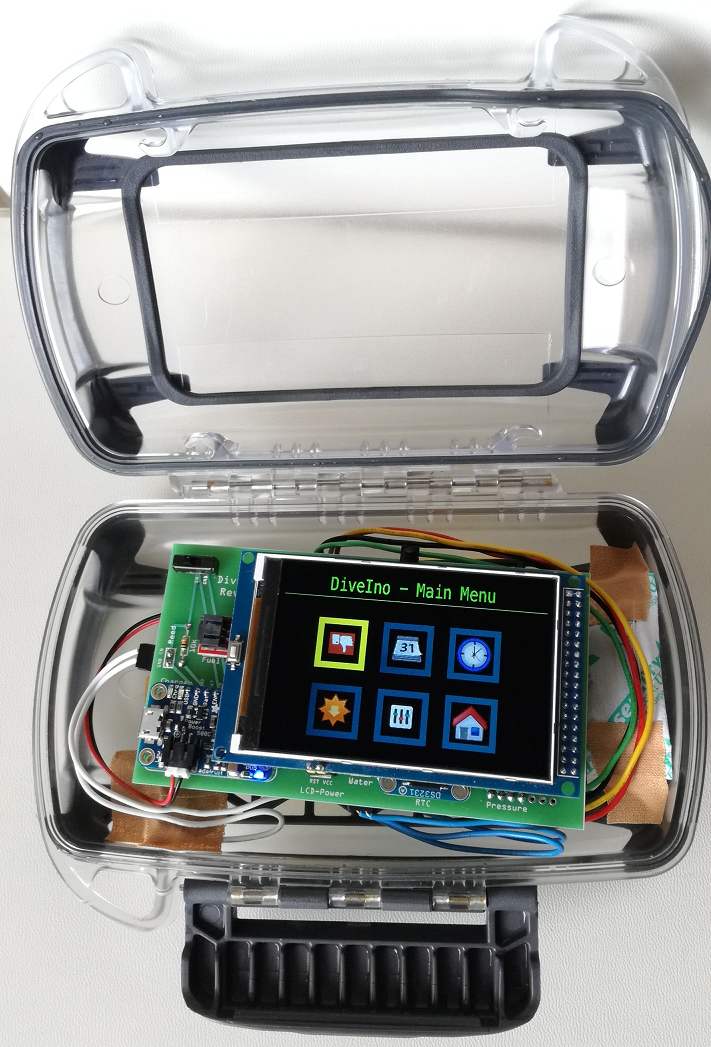
As I wrote in the Preparation for a test week on Krk island blog post, I took four DiveIno versions with me to Krk island in Croatia for some testing:
- DiveIno PCB version based on Arduino Mega 2560
- DiveIno PCB version based on Arduino Due without headers
- DiveIno Arduino Shield version Rev 03 with the replaced transistor based on Arduino Due without headers
- DiveIno Arduino Shield version Rev 04 based on Arduino Mega 2560 for now, but can be upgraded to Arduino Due
The trip itself was is operated by the Buborék Dive Center.
Prelude
On the software side the third party libraries were updated to the latest revision. DiveIno firmware was also upgraded to version 1.5.2, which supports all modifications and provides the new water switch progressbar feature.
The hardware errors were also fixed on DiveIno Arduino Shield version Rev 03. As a bonus a new DiveIno Arduino Shield version Rev 04 was built.
During this week I had five days to perform test dives with DiveIno. Let’s see what happened with DiveIno on these days!
Day 1
On the first day the weather wasn’t really nice, because of the continously blowing jugo wind generated big waves around the island. This means only shore diving was possible on this day in the Fuska bay.
Thanks to the rough weather conditions, I left DiveIno in its bag in the apartman and just performed a check dive.
Day 2
In the morning the weather became better, so we headed to the Neptun Diving Center in Silo, because its bay area is protected from the jugo wind. I performed two dives here, now with the DiveIno PCB version based on the Arduino Due without headers microcontroller board!
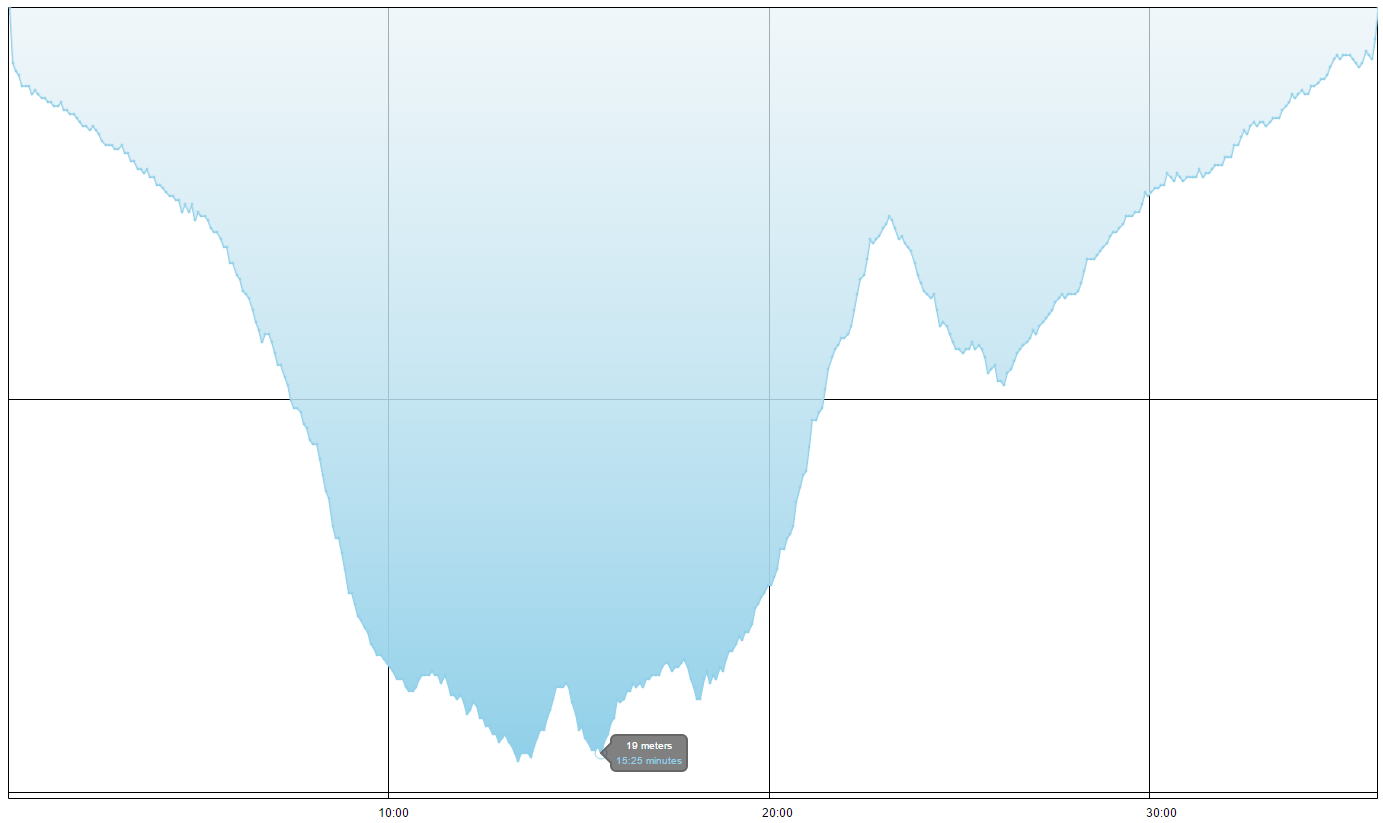
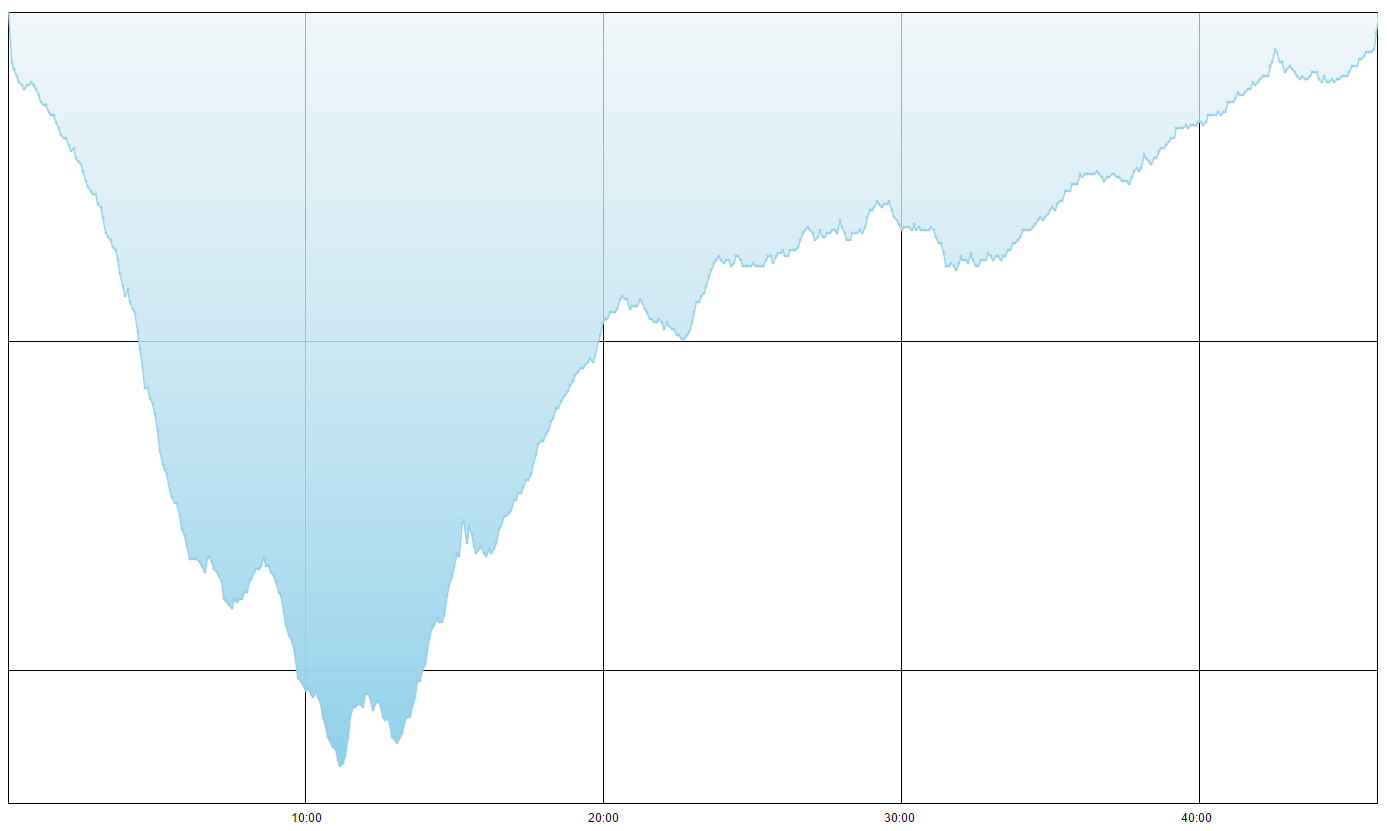
What shall I say? The water was very murky and you felt yourself under water like in the middle of a desert sand storm, but DiveIno worked well. I had no problem with it!
I would like to make only one note about its power consumption. I used an older Lithium Ion Polymer Battery - 3.7v 1200mAh, which is combined with a more power hungry Arduino Due microcontroller board, left only 25% charge after 82 minutes diving in the LiPo battery.
Day 3
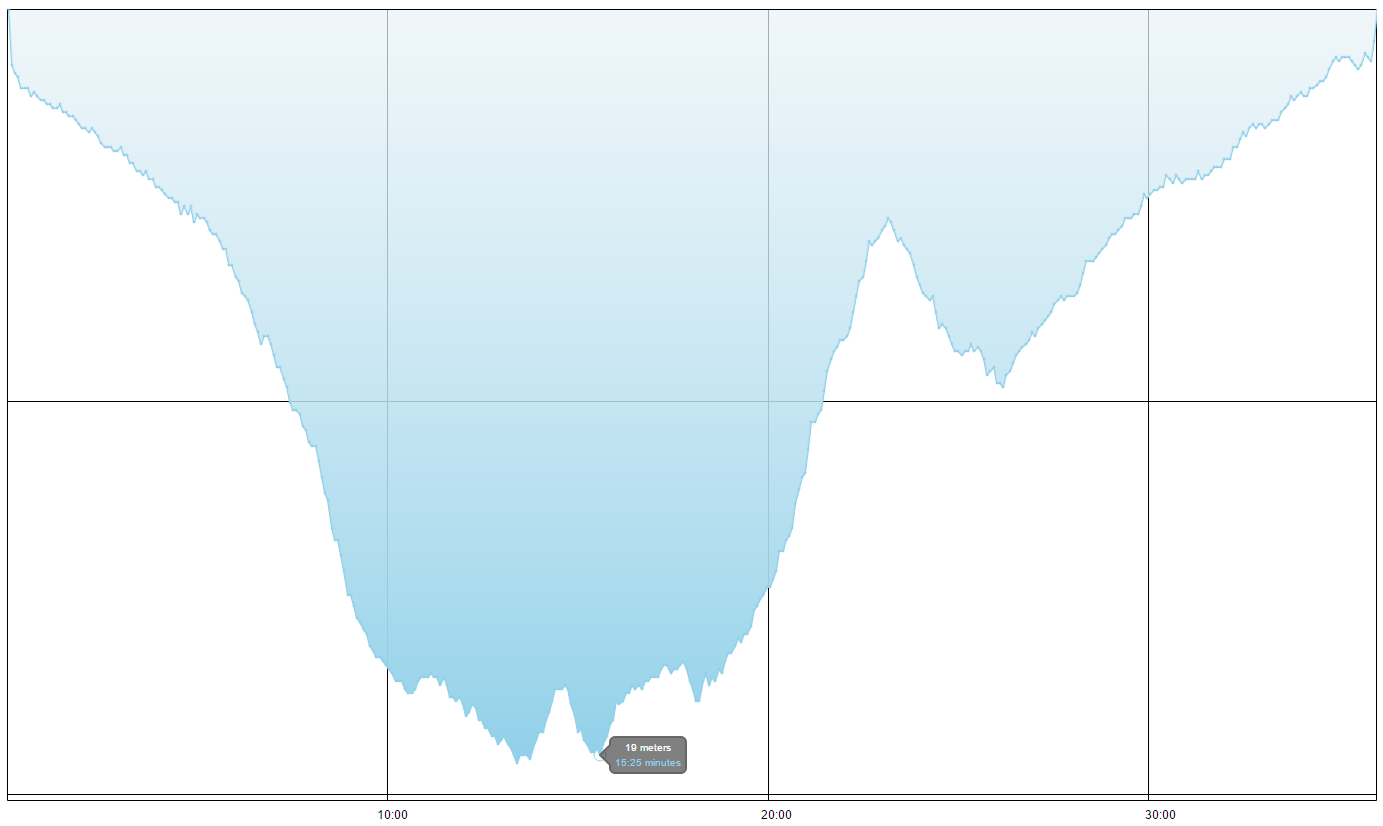
On this day we started our boat dives on board of the Obelix dive boat. I took the new DiveIno Arduino Shield version Rev 04 based on Arduino Mega 2560 with me. Yes the slower, but less power hungry version!
The first dive on the Mali Plavnik island happened without any issue:
During lunchtime the boat moved to the Krinjacol bay, because the jugo wind started to blow again. This time I wanted to perform a deeper dive around 25 meters:
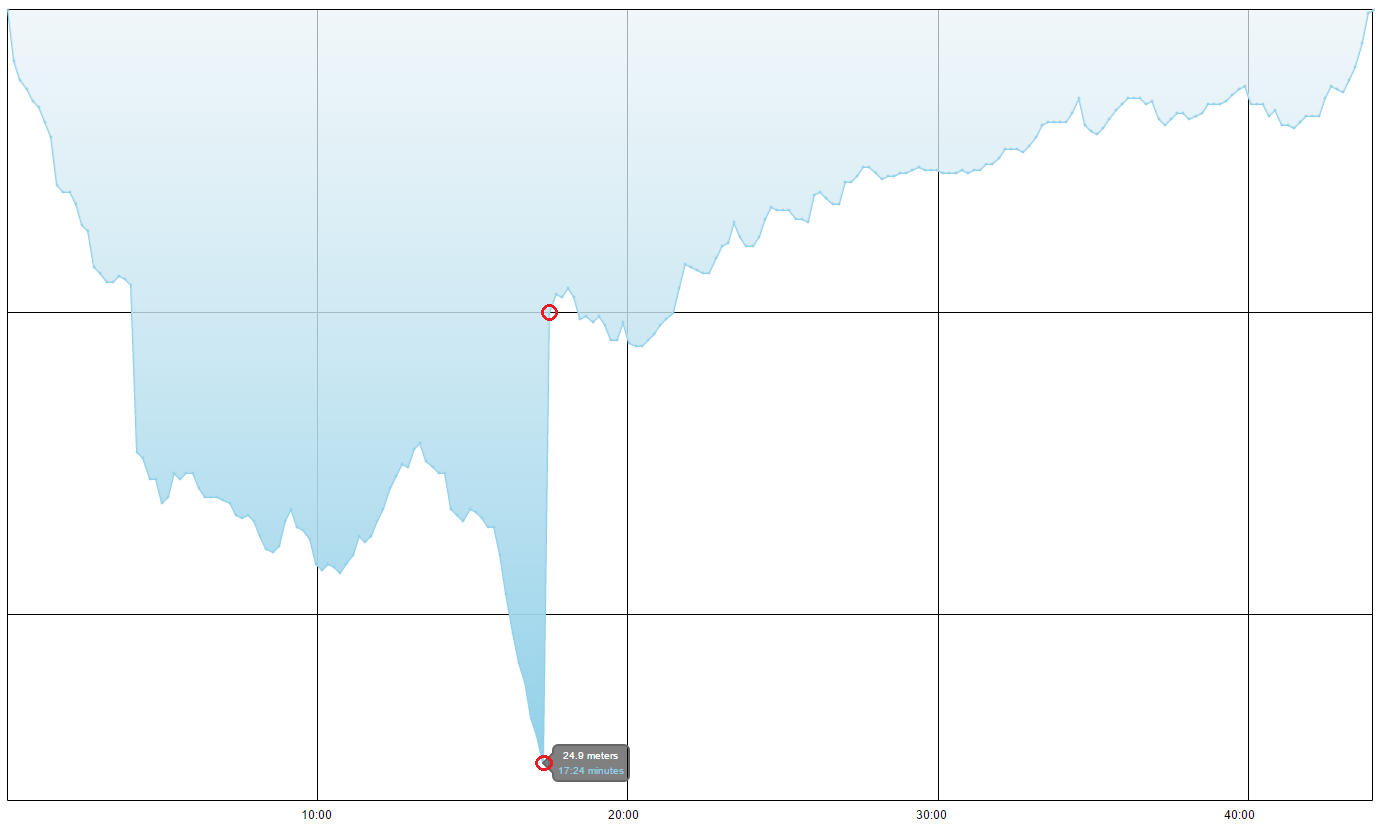
Unfortunately I wasn’t so lucky at this time, because after 16 minutes diving DiveIno stopped working in 25.5 meter deep! On stop I mean that the screen was frozen, but there was no sign of flood. When we started to ascend, everything came back around 10 meter! DiveIno started to work normally. You can notice this gap on the dive profile above marked with red circles!
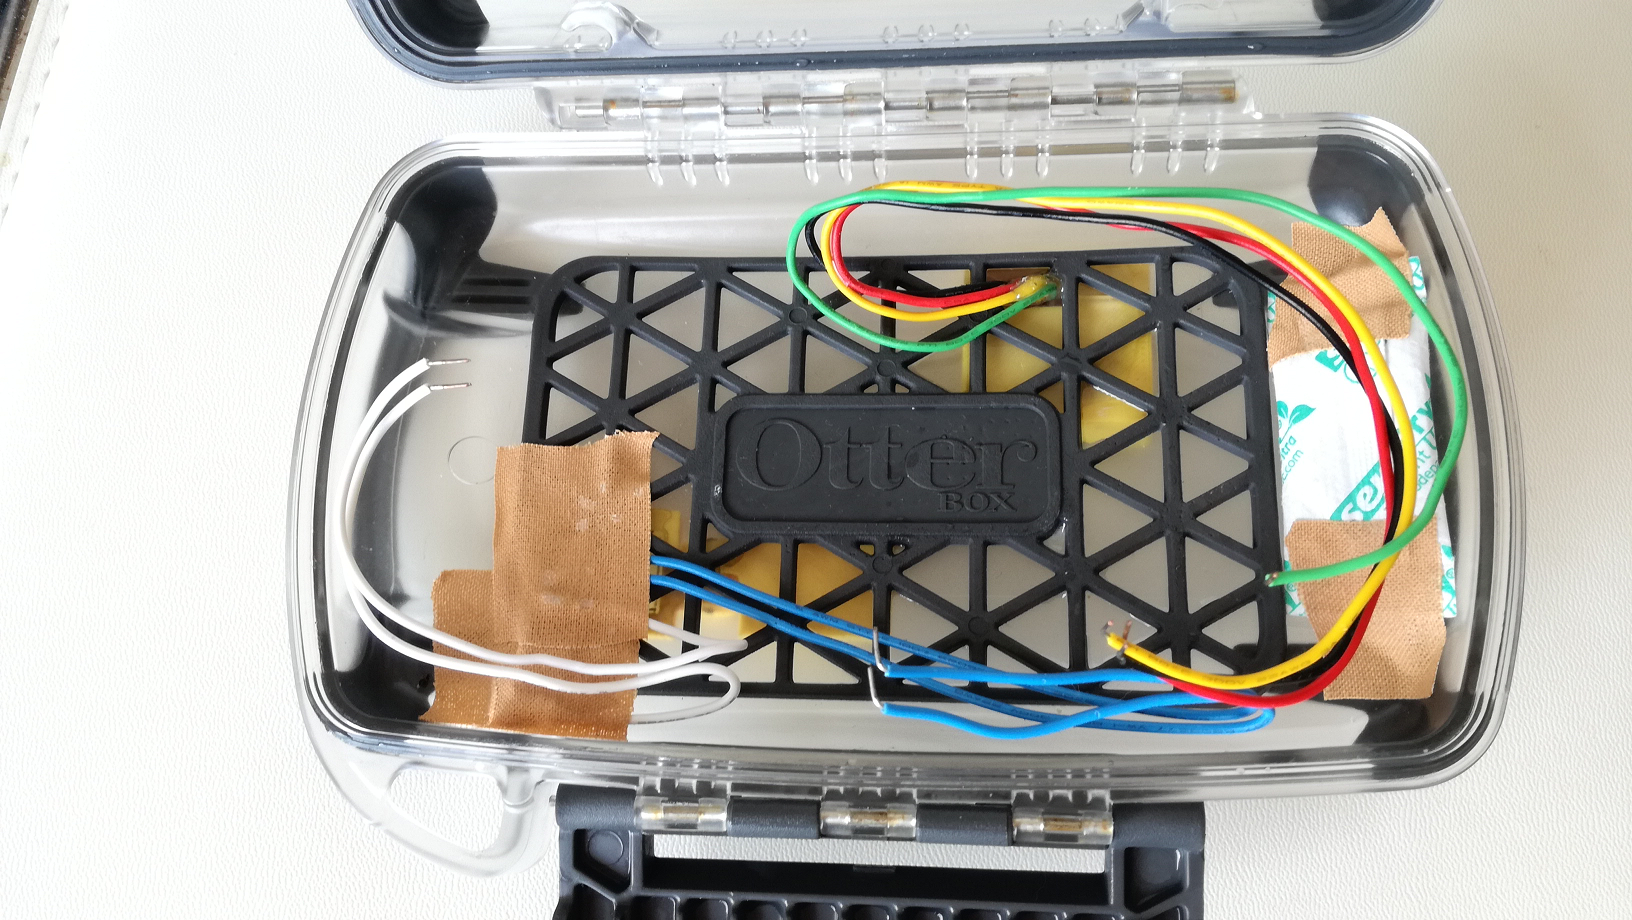
I think it was a case wiring problem. The wires, which connect the pressure sensor with the Arduino shield went under the microcontroller board PCB to the socket. When the pressure increased there was a shortcut, because the wires were pressed together too much with the other DiveIno parts. Obviously more space is required for all parts - including these wires - in the case.
I noticed another interesting thing on this day. The water vapour concentration was really high in the air, because of the heavy rain. This humidity combined with salt water, made the air conductive close to the sea level. It turned the water switch on out of water. First I thought that the BC548C NPN transistor went out of order again, but when I got back to the aparment, the issue disappered in the drier air.
Day 4
This day the weather was nicer, which let us do some dives on Cres island shores.
I took the previous DiveIno Arduino Shield version Rev 03 version with me based on Arduino Due without headers, because I wanted to test the transistor related water switch problem from the previous day.
I also moved the pressure sensor wires off from the microcontroller PCB board:
I had no issues on the first dive, but the battery charge level was dropped around 70%, so I decided to charge DiveIno up with a power bank on the boat. When I opened the case, I noticed that the sealing o-ring on the OtterBox Pursuit 40 clear case started to wear off. It was strained and lengthened quite significantly, so I had hard time to place it back properly into its normal place.
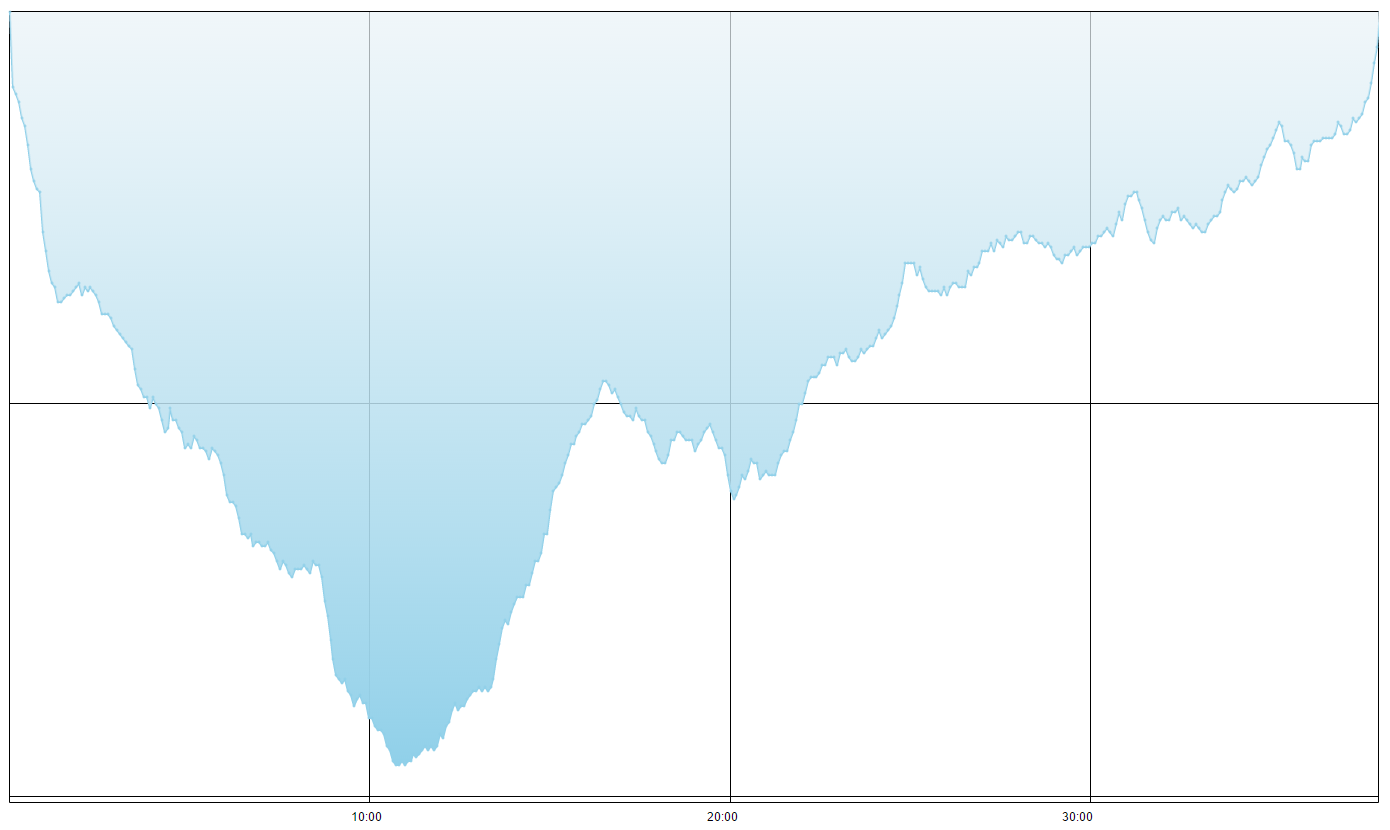
The second dive in the Kosminj bay was also uneventful. DiveIno worked well.
Day 5
I started this day with fully charged batteries and the DiveIno Arduino Shield version Rev 03 setup from the previous day. The O-ring started to really wear off, so I decided to test two things:
- How much power is left in the Arduino Due based DiveIno version after two dives?
- Can the DiveIno shield version survive 25 meters with the modified wires configuration?
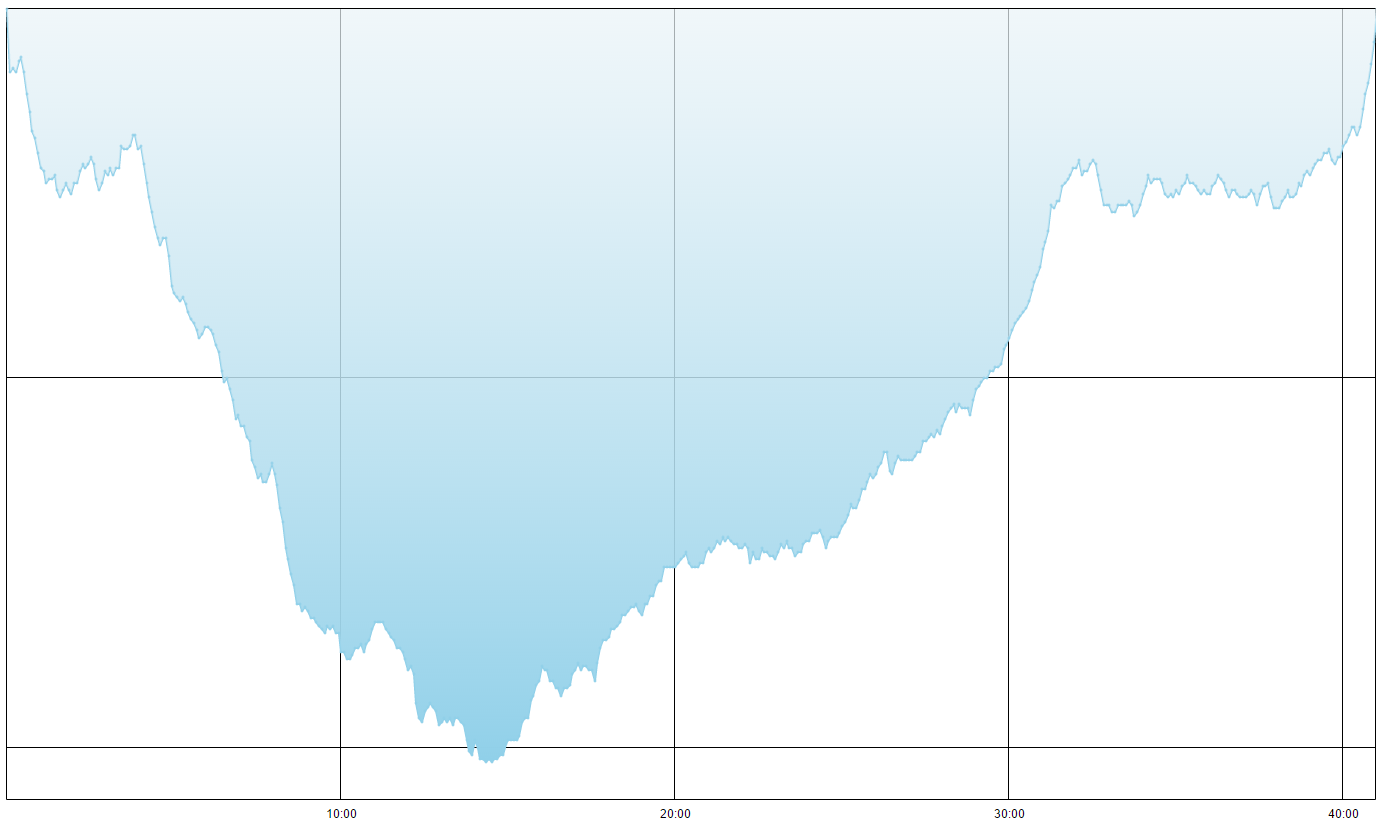
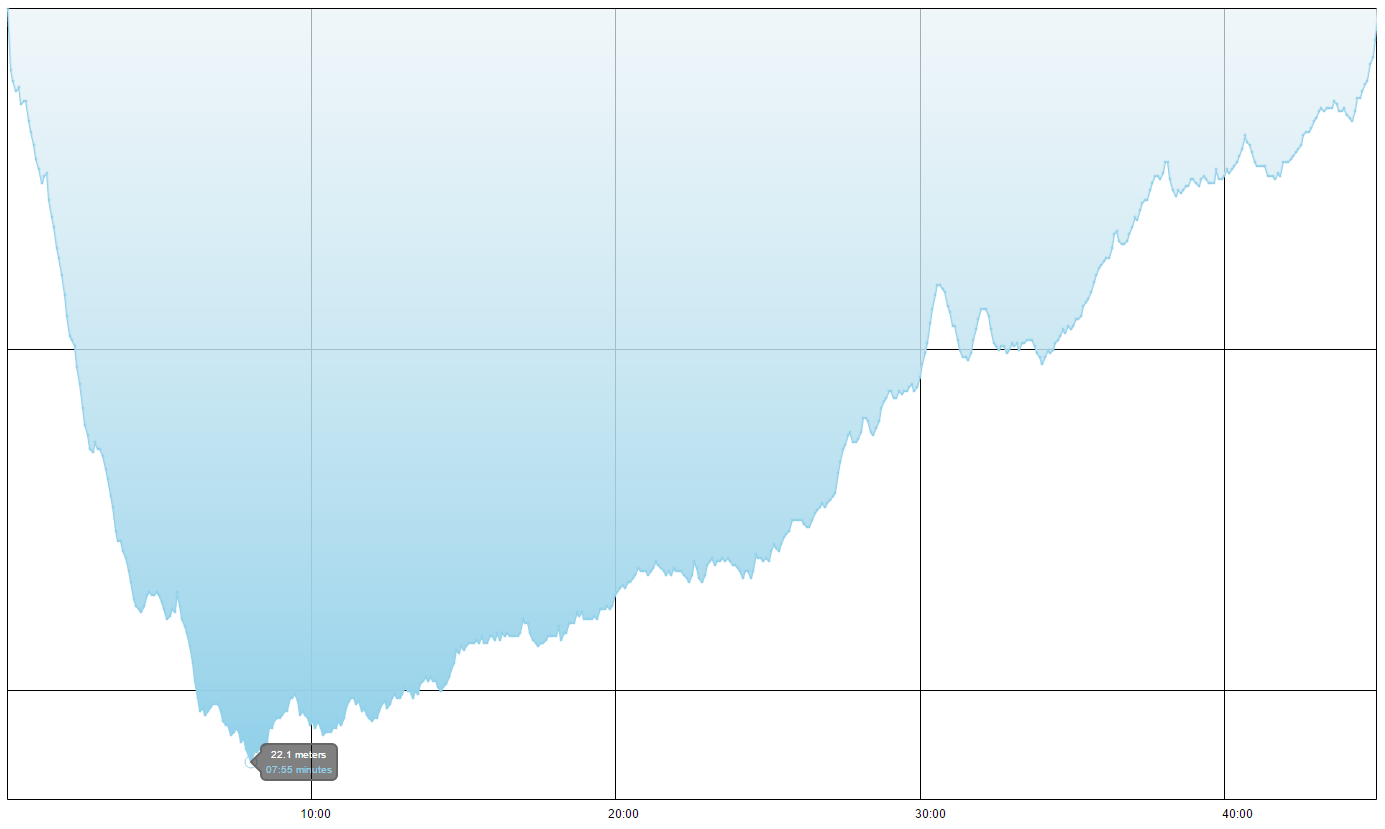
The first dive was uneventful regarding DiveIno. We had a small current in the water, but that was all. Actually I really liked the big colourful TFT screen with the easy to read depth and dive duration values. The mandatory safety stop was also a breeze with DiveIno. The charge level was around 80% after this dive.
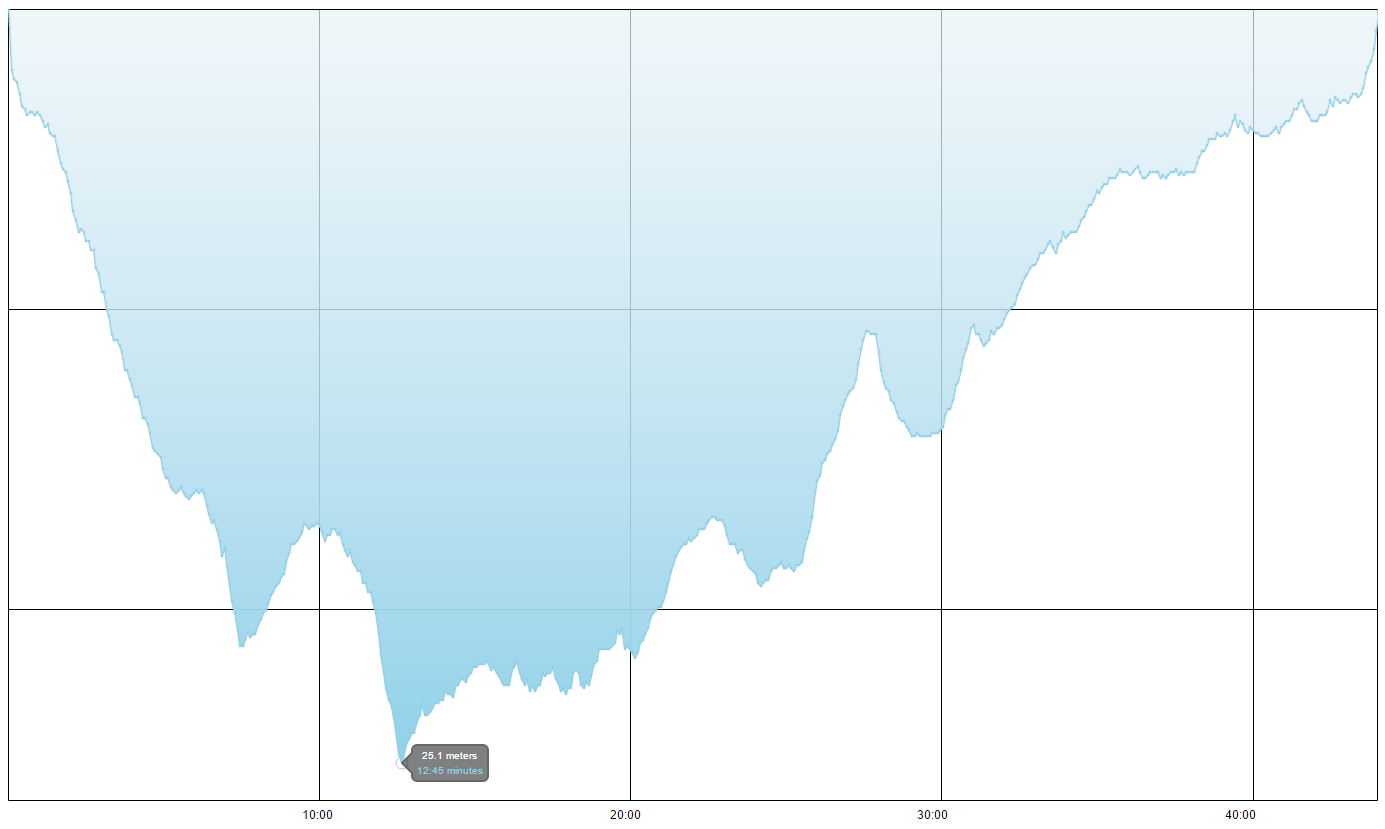
The profile above shows that DiveIno was able to make the 25 meters depth! I didn’t risk to bring it deeper, because the O ring condition became really bad this morning. It was quite hard to properly close the case.
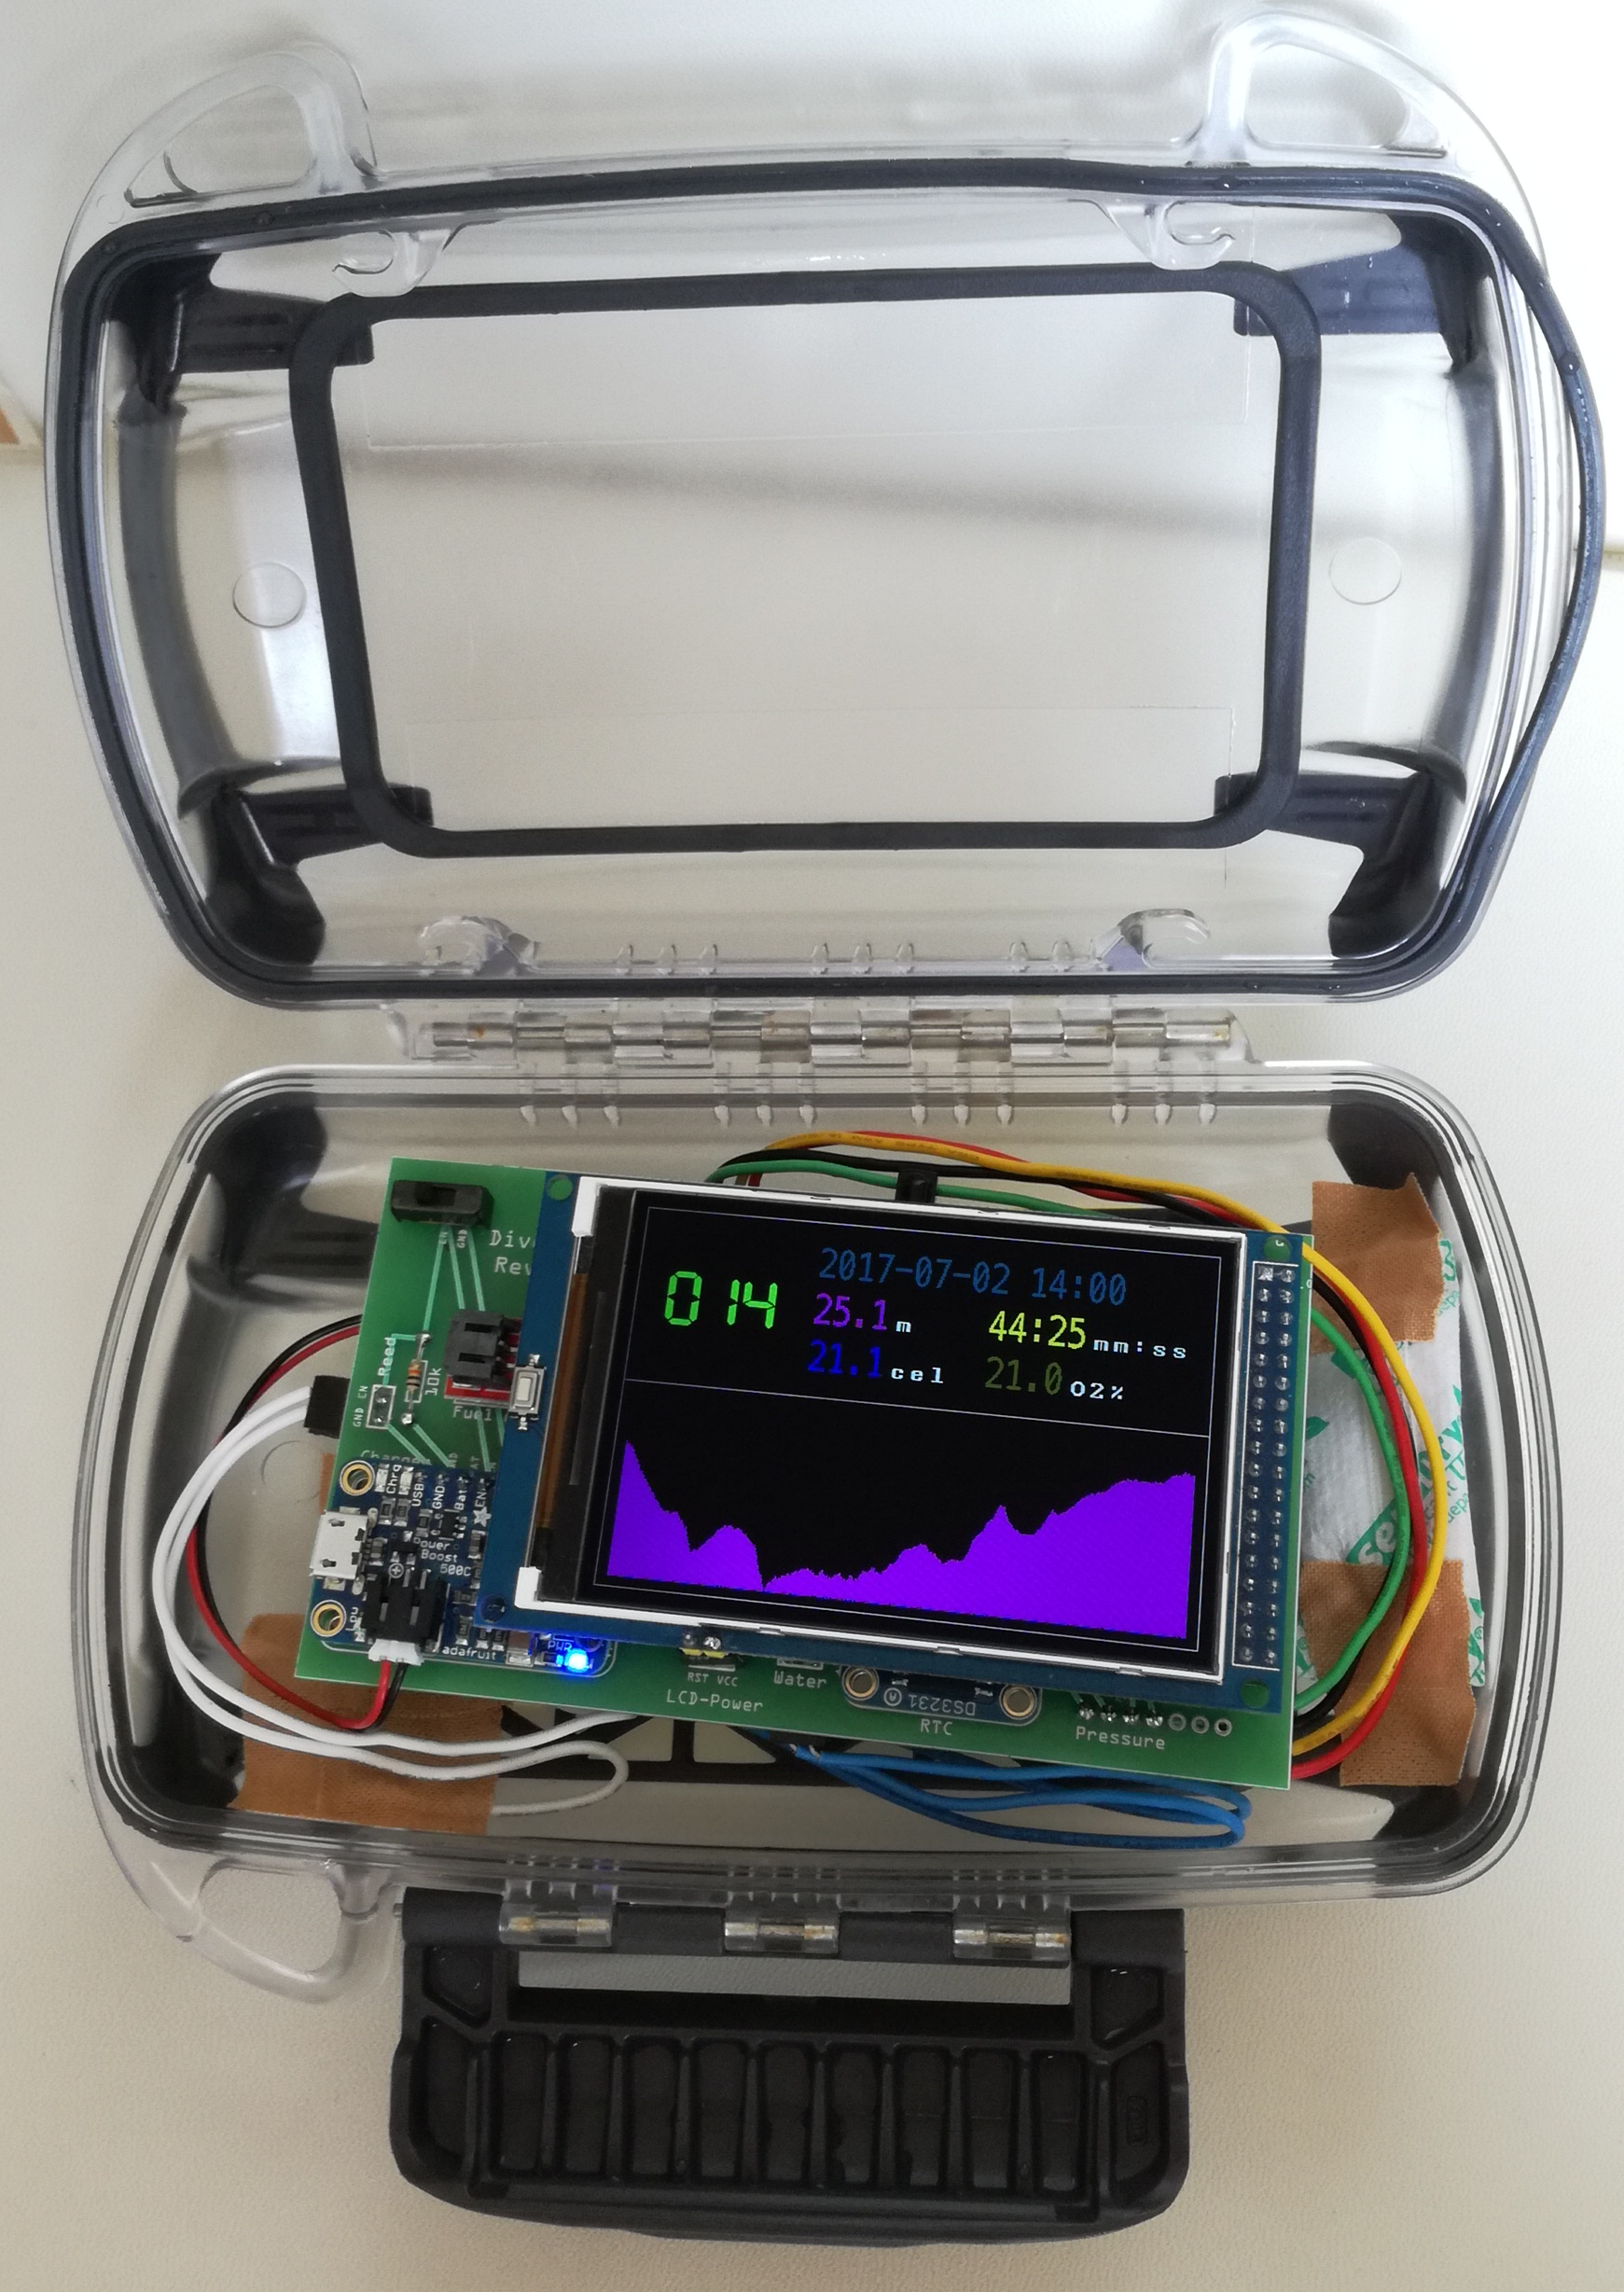
At the end of the dive the charge level was around 40%, which proves that this configuration can do two dives per day without a recharge.
Conclusion
The good news is that DiveIno survived the test week without any software problem! All dives were logged onto the SD card. I could make an export into UDCF files with DiveIno Converter and then upload these file into my divelogs.de based logbook.
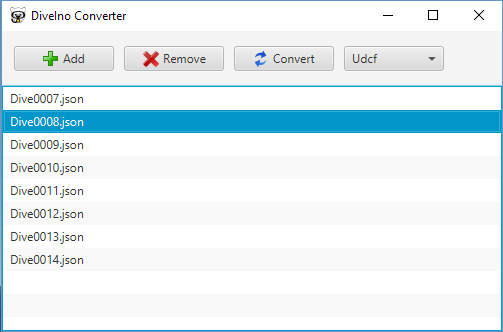
On the hardware level there were no issues with DiveIno itself, instead I had case problems:
- The wires and other DiveIno parts need enough space to prevent shortcuts
- The o-ring sealing has to be replaced
Besides these I had the increased air humidity problem, which turned on the water switch even on the surface.
All in all I can say that DiveIno works now, but some enhancements can be made to make it even better!
Enhancement ideas
A new setting can be introduced to turn DiveIno into dive mode after it reaches 0.3 meter depth. I would call it deep activation mode. It can be enabled and disabled in the Settings menu. At the same time water activation based on the water switch can be turned on and off as well.
The charging options should be improved as well. I can think of the followings:
- Wireless charging
- Wired USB charging without opening the case
- Lower power consumption
Actually the divers who met with DiveIno complained about its size. It is too bulky to take it with you for a dive. They asked for a smaller wrist mount version.
I think I can reduce DiveIno size and its power consumption at the same time. The TFT LCD screen consumes the most power, so it can be replaced with an OLED screen. Also the OtterBox Pursuit 40 case can be replaced with a smaller action camera housing. Besides software enhancements I am going to work on these issues in the future!
